


Try this class practical to prepare a polymer glue from milk using the protein casein
A glue can be made from milk by souring it using vinegar (an acid) which separates it into curds and whey. The curds can be neutralised by various bases to produce a variety of different glues.
In this experiment, students make glue using a protein in milk called casein. They separate the casein from milk by coagulation and precipitation, before testing their glue for strength by sticking together two lolly sticks and attaching weights to them.
The activity lends itself to group, investigative and competitive work.
In general it is a good idea to give students the basic glue-making recipe described in the procedure notes and then allow them to vary it. Depending on what you are trying to achieve in the activity, you may or may not want them to make detailed notes about exactly what goes into each mixture. Students can make up one ‘batch’ with one type of milk and then divide the curds and water mixture into portions and add a different base to each portion. A large number of different glues can then be made without too much effort.
The glues can be tested by first using them to stick together lolly sticks, and then attaching weights to the sticks until the glue gives way. If paper is used instead, the paper almost always breaks first as the glues are surprisingly strong. Students should wear eye protection, because the sticks can splinter if they break. In addition, a sand tray or box of scrunched up newspaper should be placed under the weights to avoid harming students’ feet.
Making one glue takes about 15 minutes. More glues can be made quickly as the students already have the equipment set up. This can be fitted into one long lesson, although there may be difficulties with getting the glues dried and tested. It is probably better suited to two lessons; one to make the glues and the other to test them.
Equipment
Apparatus
- Eye protection
- Spatulas
- Stirring rods
- Measuring cylinders, 100 cm3 and 25 cm3
- Beakers, 100 cm3 and 250 cm3
- Bunsen burner
- Heat resistant mat
- Tripod
- Gauze
- Filter funnel and paper
- Lolly sticks (see note 8 below)
- Indicator paper
- Weights (the ones on a hook are ideal) to be added about 100 g at a time
- Sand tray or box of scrunched up newspaper
Chemicals
- Milk (semi-skimmed, full fat, and skimmed), at least 100 cm3
- Vinegar
- Bases, eg sodium hydrogen carbonate, magnesium carbonate, calcium carbonate, milk of magnesia
Health, safety and technical notes
- Read our standard health and safety guidance.
- Wear eye protection throughout.
- Vinegar – see CLEAPSS Hazcard HC038a. Distilled vinegar is best because it is colourless. Other forms of vinegar can be used. A dilute solution of ethanoic acid could also be used.
- Sodium hydrogen carbonate – see CLEAPSS Hazcard HC095A.
- Magnesium carbonate – see CLEAPSS Hazcard HC059b.
- Calcium carbonate – see CLEAPSS Hazcard HC019B.
- Milk of magnesia – see CLEAPSS Hazcard HC059b.
- Lolly sticks are available in most craft shops.
Procedure
Making the glue
- Measure 100 cm3 of milk and 20 cm3 of vinegar into a beaker. Place the beaker on a tripod and gauze and heat over the Bunsen burner. Stir constantly until small lumps start to form. Stop heating, but keep stirring until no more lumps form.
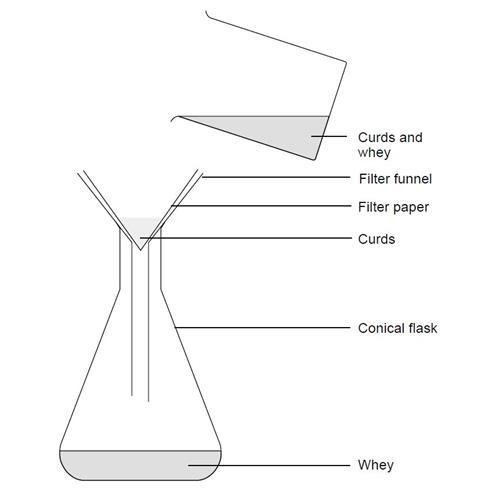
- Let the lumps settle, then decant the liquid from the top. Filter the rest of the mixture and keep the solid part (which is called the curds). Wash the beaker.
- Gently squeeze off any excess liquid from the curds and then put them into the beaker. Add 15 cm3 of water and stir until the mixture is smooth.
- Add about half a spatula of the base and check that the mixture is neutral using indicator paper. If it isn’t, add more base until it is. This is the glue.
- Use the glue to stick together two lolly sticks. Only have 2 cm of the sticks overlapping and stuck together. Label the lolly sticks with the milk and base used.
- Make other glues by using different bases and milks and use them to stick together more lolly sticks.
Testing the glue
- Arrange two tables or chairs about 10 cm apart. Lay your glued lolly sticks so that they form a bridge between the two.
- Hang a weights hook onto the lower of the two lolly sticks as close to the glued join as you can. Add weights about 10 N at a time and record the force required to break the glue.
Teaching notes
This activity can be used to encourage a group of students to work together, as an investigation (‘which is the strongest glue?’) or as a competition (‘who can make the strongest glue?’).
Variations to the glue making can include: using ordinary, semi-skimmed and skimmed milk with a variety of bases – eg sodium hydrogen carbonate, magnesium carbonate, calcium carbonate. Carbonates are good as they bubble when you add them so it is easy to tell when the glue is neutralised without needing to use indicators; the pH of the glue (ie add not enough through to excess base); the acid used to curdle the milk.
Skimmed milk tends to give the best glues. The glue consists of particles of the protein casein that are precipitated from the milk by the adding the acid. It is the polymerisation of these protein molecules that forms the glue. The fat in the milk can get in the way of these polymer chains – lubricating them like oil does in a bicycle chain – and preventing them from sticking together as effectively.
Casein is the predominant protein found in fresh milk and cheese. In milk it exists in the form of a soluble calcium salt.
In its acidic form, casein is precipitated by acids such as ethanoic acid (the predominant acid in vinegar). In this experiment, calcium ethanoate is a by-product of the initial souring process, and it is one of the components of the whey solution. The insoluble casein which forms the curds has relatively little secondary or tertiary structure. This means it cannot denature (change structure). It is relatively hydrophobic, and this is why it is fairly insoluble in water.
If appropriate, students may like to be reminded of Little Miss Muffet ‘who sat on a tuffet, eating her curds and whey ….’ Students should realise that they have probably eaten curds and whey, because these are the lumps and the liquid in cottage cheese. However, in cheese manufacture vinegar isn’t the agent used to precipitate out the casein; the enzyme ‘rennin’ is used instead.
In addition to being consumed in milk, casein is used to manufacture adhesives, binders, protective coatings, plastics (such as for knife handles and knitting needles), fabrics, food additives, and many other products. It is commonly used by bodybuilders as a slow-digesting source of amino acids.
Questions for students
Here are some possible questions for students:
- What do you think is the purpose of the vinegar in this experiment?
- To convert the casein into an insoluble form – the curds.
- Why is sodium hydrogen carbonate added?
- To remove any excess acid.
- What is the gas given off when the sodium hydrogen carbonate is being added?
- Carbon dioxide - acids react with carbonates to form this gas.
- Use a search engine to find information about casein, which is present in milk. What type of substance is casein?
- Casein is a protein, or, more precisely, a phosphoprotein.
References
Additional information
This is a resource from the Practical Chemistry project, developed by the Nuffield Foundation and the Royal Society of Chemistry. Practical Chemistry activities accompany Practical Physics and Practical Biology. © Nuffield Foundation and the Royal Society of Chemistry


1 Reader's comment